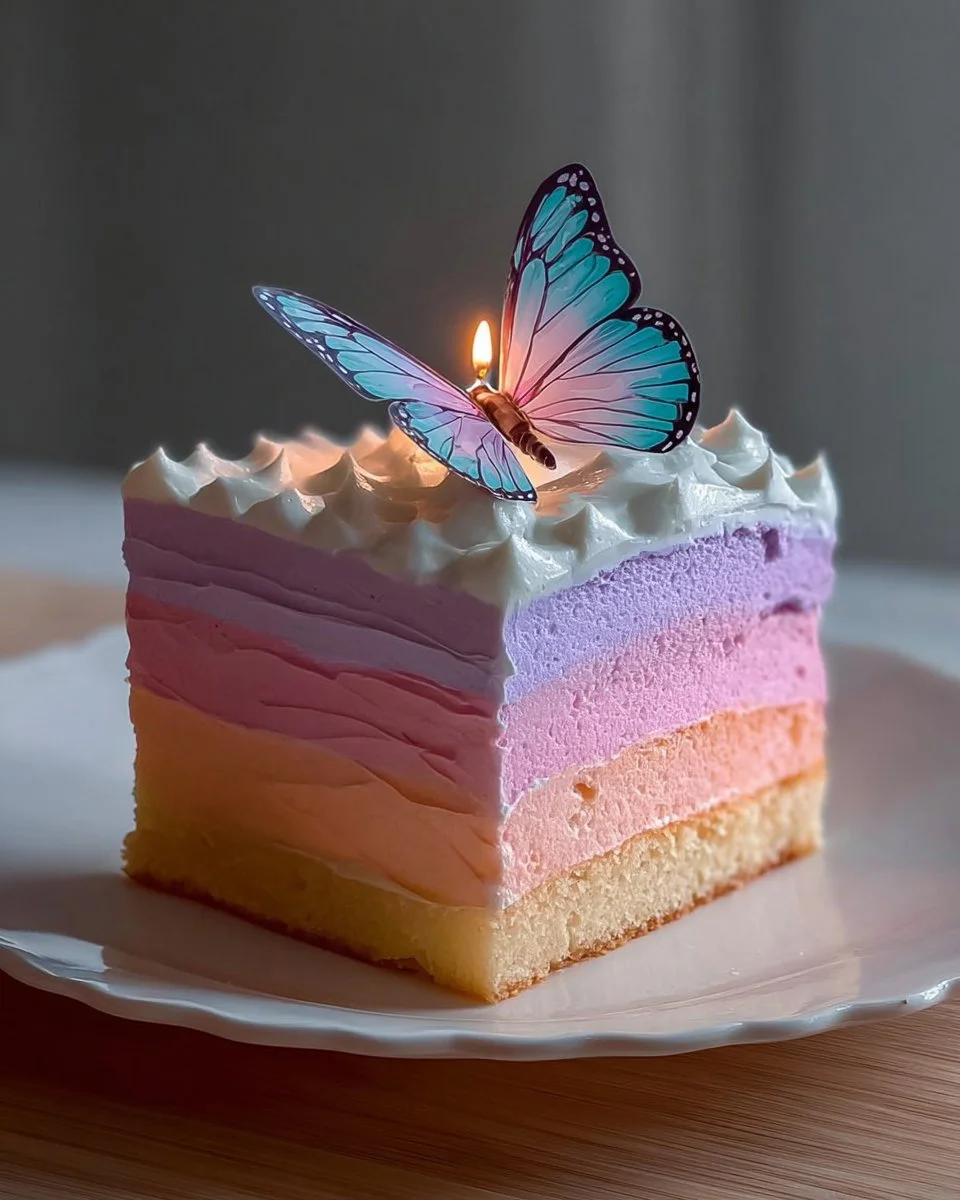
The sweet symphony of celebration begins as you gather your loved ones, the air filled with laughter and chatter. A Dreamy Ombre Birthday Cake takes center stage, its stunning layers glistening like the sunset, transitioning from deep hues to soft pastels that evoke pure joy. The moment you slice through this masterpiece, the gentle crumb structure gives way, releasing the rich aromas of your favorite cake flavor blending beautifully with the creamy buttercream frosting. That first bite is nothing short of bliss—the cake melts delightfully on your tongue, while the velvety frosting dances smoothly between your palate, creating a heavenly experience that lingers on.
Visualize the sheer delight of cutting into a cake that is not just a dessert but an art piece, seemingly crafted with love and care. With each layer bringing forward varying shades of color, the dreamy aesthetic tells a story of its own. As the vibrant topping features delicate butterfly decorations, each bite is not just about flavor; it’s a celebration of beauty, creativity, and the cherished memories made on those special occasions.
Why You’ll Love This Dreamy Ombre Birthday Cake
This lush cake serves far more than just a slice of sweetness; it is the star of life’s precious celebrations! Its visually stunning ombre effect captivates hearts long before it even reaches the taste buds. Elevate birthdays, anniversaries, or any joyous occasion with this marbled cake, striking a perfect balance between elegance and playfulness.
Each slice offers layers of moist, flavorful cake expertly paired with velvety buttercream, ensuring that every mouthful is a delightful surprise. Imagine the compliments from guests, the twinkle in their eyes as they marvel at its beauty, and the satisfied smiles as they savor the lush flavors. This cake is bound to become the centerpiece of your celebrations, leaving everyone reminiscing and craving for more.
Preparation Phase & Tools to Use
Making a Dreamy Ombre Birthday Cake may feel intimidating, but with the right tools, kitchen space transforms into a joyful playground. Here’s what you’ll need:
- Mixing Bowls: Essential for blending your moist cake batter and creamy frosting. A variety of sizes allows for easy organization and preparation.
- Electric Mixer: Makes mixing your cake batter and buttercream a breeze. The air whipped into the frosting contributes to its light and fluffy texture—an absolute must for maximum creaminess!
- Spatulas: Useful for spreading the frosting evenly between and on top of the cake, achieving that flawless, professional finish.
- Cake Round Pans: Opt for non-stick or grease the pans well to ensure your beautiful layers slide out smoothly.
- Piping Bag & Decorating Tips: For layering the frosting and achieving a decorative finish, creating a masterpiece worthy of any occasion.
Before diving into the fun, prep your ingredients and tools. Gather everything within arm’s reach, preheat your oven, and create a sense of excitement.
Ingredients for Dreamy Ombre Birthday Cake
Crafting this luscious Dreamy Ombre Birthday Cake requires a delightful ensemble of ingredients:
- 2 Layers of Cake (Your Favorite Flavor): Vanilla, chocolate, lemon, or even red velvet! Each option infuses its unique essence into the cake.
- Buttercream Frosting (in Multiple Colors): The base is typically made with butter, powdered sugar, heavy cream, and vanilla extract. Adjust sweetness by adding more sugar or soften with a splash of cream.
- Food Coloring (for the Ombre Effect): Gel food coloring works wonders here, providing vibrant shades without altering the frosting’s texture.
- Butterfly Decoration (Edible or Decorative): Choose edible options for an extra touch of whimsy, or opt for beautiful decorative butterflied designs to adorn the top.
Feel free to swap flavors or colors to fit personal tastes or themed celebrations!
How to Make Dreamy Ombre Birthday Cake
Creating your masterpiece is both a joy and an adventure! Follow these clear, step-by-step instructions to achieve cake perfection:
-
Bake Your Favorite Cake Layers: Preheat the oven as per your cake recipe. Grease and flour your round cake pans before pouring in the batter. Bake until golden brown, allowing them to cool completely on a wire rack. Tip: Ensure your cake layers are chilled before frosting to avoid sliding!
-
Prepare Buttercream Frosting: While your cakes cool, beat softened butter until light and creamy. Gradually add powdered sugar and a splash of heavy cream, mixing until smooth. You want a heavenly, spreadable consistency.
-
Divide into Bowls: Separate the buttercream into bowls based on the number of ombre shades you wish to create.
-
Add Food Coloring: Introduce a few drops of food coloring to each bowl, creating a gradient from darker to lighter shades. Mix well until colors are fully combined.
-
Frost Your Layers: Begin with the darkest color on your first layer of cake. Place the second layer on top and frost it with the medium shade. Gradually transition to the lighter shades as you build up the cake. Tip: Use a spatula for smooth edges and keep a bowl of hot water to clean it between frosting different colors for a neater finish!
-
Decorate the Top: Use the last hue and a piping bag fitted with a decorative tip to create beautiful swirls. Finally, gently place the butterfly decoration on top to complete the gorgeous design.
-
Serve and Enjoy: Pair this cake with laughter and love as you present it to your eager guests. Slice into beautiful layers revealing the stunning ombre colors within!
Chef’s Notes & Helpful Tips
-
Make-Ahead Tips: Prepare cake layers a day in advance, storing them wrapped in plastic wrap in the fridge. This prevents drying out and enhances flavor.
-
Cooking Alternatives: If you’re short on time, a pressure cooker or air fryer can quickly bake your layers without compromising moisture.
-
Customization Ideas: Experiment with flavors by adding citrus zest, chocolate chips, or even incorporating fillings between layers for added surprise!
Common Mistakes to Avoid
Crafting a Dreamy Ombre Birthday Cake is a labor of love, and avoiding certain missteps ensures your cake shines. Here are some common pitfalls and ways to dodge them:
-
Overmixing Batter: This can develop gluten and create a dense cake. Gently fold ingredients to maintain that heavenly, fluffy texture.
-
Neglecting Cake Cooling: Frosting warm cake layers will result in a melting, sliding mess. Prioritize full cooling for beautiful presentation.
-
Skipping the Tasting Trial: Always sample your frosting and cake flavor separately! Adjust as necessary before decorating your masterpiece.
What to Serve With Dreamy Ombre Birthday Cake
Pairing ideas elevate the experience even more! Consider these indulgent companions:
-
Whipped Cream: Light and airy, it enhances the sweetness while maintaining a delicate touch.
-
Fresh Berries: The tartness of strawberries, raspberries, or blueberries complements the sweetness.
-
Ice Cream: A scoop of vanilla or chocolate creates a delightful contrast and adds richness.
-
Fruit Sauces: A drizzle of raspberry or passion fruit sauce adds a luscious layer of flavor.
-
Coffee or Tea: A warm cup of coffee or a fragrant cup of herbal tea balances the cake’s sweetness perfectly.
-
Champagne or Sparkling Water: Bubbly refreshment celebrates the occasion, enhancing every slice of deliciousness.
Storage & Reheating Instructions
Storing your Dreamy Ombre Birthday Cake correctly keeps it fresh for days:
-
Fridge: Slice and place in an airtight container for up to 4-5 days. Ensure it’s well-wrapped to prevent drying out.
-
Freezer: For longer storage, freeze individual slices in plastic wrap followed by aluminum foil for up to 3 months. Allow to thaw in the fridge overnight before serving.
-
Reheating: If you prefer warm cake, gently microwave a slice for about 10-15 seconds. Watch carefully to avoid overheating!
Estimated Nutrition Information
While indulging in your delicious creation, keep in mind these approximate nutrition values (values may vary based on specific ingredients and portion sizes):
- Calories: ~400 per slice
- Fat: ~20g
- Sugar: ~35g
- Carbs: ~50g
Note: These figures are indicative—always adjust based on your chosen cake flavor and frosting recipe.
FAQs
-
Can I use a boxed cake mix for this recipe?
Absolutely! Using a boxed cake mix simplifies the baking process while still allowing for customization. Follow the package instructions and enjoy! -
What frosting can I use instead of buttercream?
Cream cheese frosting or whipped ganache offers a delightful twist. Both have unique flavors that can elevate your cake in different ways. -
How can I achieve a smoother buttercream?
Ensure your butter is softened to room temperature before mixing. Don’t be shy with the beating; fluffiness comes with good aeration! -
Can I make mini ombre cakes?
Certainly! Use mini cake pans for personal servings. Just remember to adjust baking times and frosting accordingly. -
Are there gluten-free options available?
Yes! Substitute the all-purpose flour with a gluten-free blend. Ensure other ingredients, especially the baking powder, are gluten-free.
Conclusion
An enchanting Dreamy Ombre Birthday Cake awaits your creativity and devotion. This recipe not only results in a stunning cake but also an experience—each layer, each frosting swirl, shares a joyous story nurtured through cherished time spent baking and celebrating. So roll up your sleeves and dive into creating this delectable showstopper! Trust us: your taste buds (and everyone who gets a slice) will thank you.
Print
Dreamy Ombre Birthday Cake
- Prep Time: 30 minutes
- Cook Time: 30 minutes
- Total Time: 1 hour
- Yield: 12 servings 1x
- Category: Dessert
- Method: Baking
- Cuisine: American
- Diet: Vegetarian
Description
A visually stunning cake with layers of moist cake and creamy buttercream frosting, perfect for celebrations.
Ingredients
- 2 Layers of Cake (Your Favorite Flavor: Vanilla, chocolate, lemon, or red velvet)
- Buttercream Frosting (in Multiple Colors)
- Food Coloring (for the Ombre Effect)
- Butterfly Decoration (Edible or Decorative)
Instructions
- Bake Your Favorite Cake Layers: Preheat the oven as per your cake recipe. Grease and flour your round cake pans before pouring in the batter. Bake until golden brown, allowing them to cool completely on a wire rack.
- Prepare Buttercream Frosting: While your cakes cool, beat softened butter until light and creamy. Gradually add powdered sugar and a splash of heavy cream, mixing until smooth.
- Divide into Bowls: Separate the buttercream into bowls based on the number of ombre shades you wish to create.
- Add Food Coloring: Introduce a few drops of food coloring to each bowl, creating a gradient from darker to lighter shades.
- Frost Your Layers: Begin with the darkest color on your first layer of cake. Place the second layer on top and frost it with the medium shade. Gradually transition to the lighter shades as you build up the cake.
- Decorate the Top: Use the last hue and a piping bag fitted with a decorative tip to create beautiful swirls. Finally, gently place the butterfly decoration on top.
- Serve and Enjoy: Present it to your eager guests, slicing into the beautiful layers revealing the stunning ombre colors within!
Notes
Make-ahead tips: Prepare cake layers a day in advance; refrigerate them to prevent drying out. Avoid overmixing your batter for a fluffy texture.
Nutrition
- Serving Size: 1 slice
- Calories: 400
- Sugar: 35g
- Sodium: 150mg
- Fat: 20g
- Saturated Fat: 10g
- Unsaturated Fat: 8g
- Trans Fat: 0g
- Carbohydrates: 50g
- Fiber: 1g
- Protein: 4g
- Cholesterol: 50mg