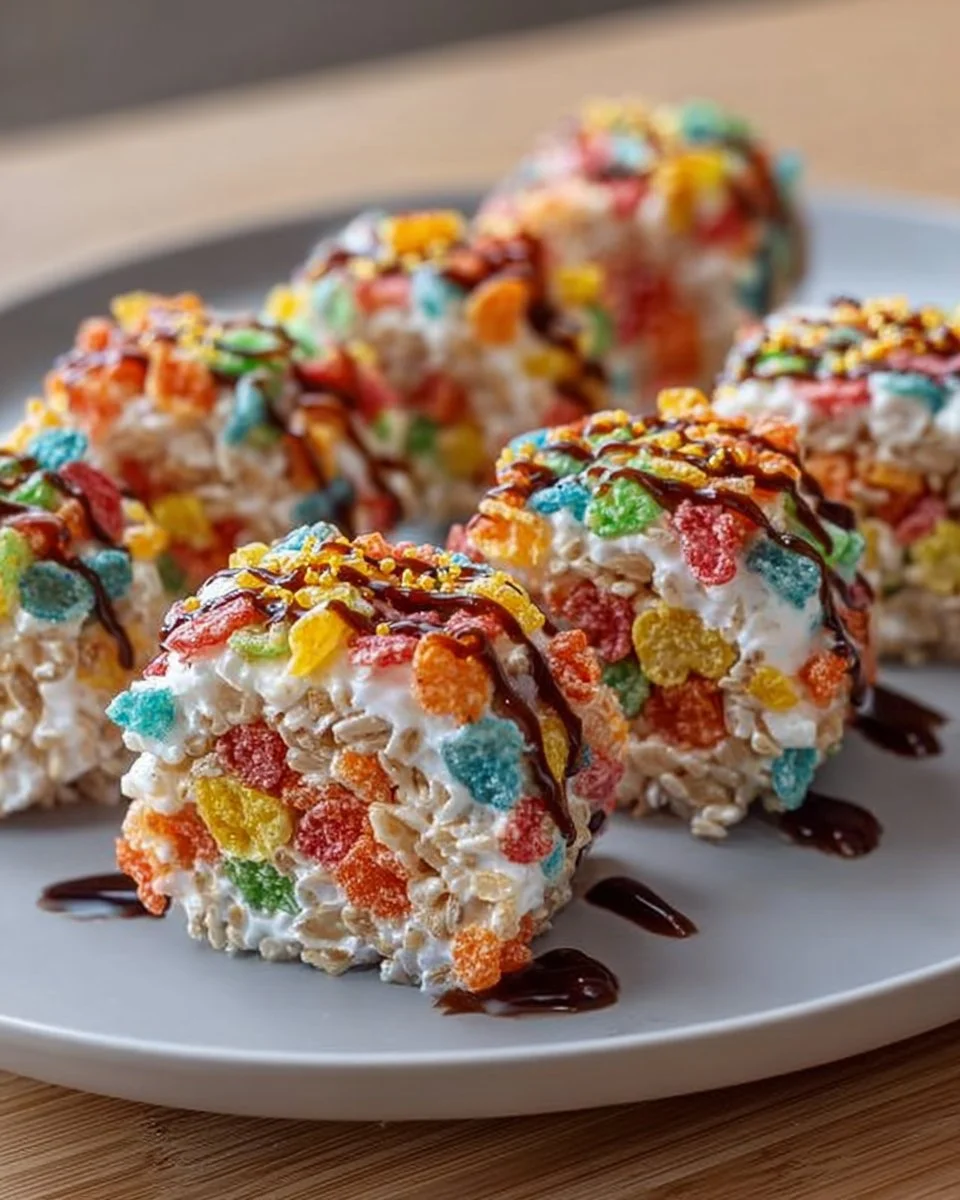
Imagine a delightful creation that combines the nostalgia of childhood cereals with the playful art of sushi. Fruity Pebbles Sushi brings together the vibrant crunch of Fruity Pebbles with a soft, chewy texture reminiscent of traditional sushi rice, creating a fusion that captivates both the eye and the palate. The vivid colors of the cereal mirror the joy it evokes, while the sweetness from the marshmallows adds a satisfying, gooey element. Each bite bursts with flavor and texture, offering a delightful contrast that dances on your taste buds. The subtle aroma of toasted nori complements the sweet, fruity aroma of the cereal, elevating this dish into an adventure for your senses.
As you prepare this cheerful treat, the kitchen fills with playful scents reminiscent of a warm summer day. The sound of crunching cereal and the soft melting of marshmallows create a joyful symphony that invites you to join in the fun. Fruity Pebbles Sushi is more than just a dessert; it’s a whimsical journey that beckons you to gather your loved ones around, creating memories filled with laughter, sweetness, and, of course, delightful bites of colorful sushi rolls.
Why You’ll Love This Fruity Pebbles Sushi
Fruity Pebbles Sushi stands out by combining nostalgia with creativity, making each roll a playful twist on classic sushi. The celebration of flavors doesn’t just stop at the visuals; the combination of creamy marshmallow and fruity cereal creates an explosion of sweetness that appeals to both kids and adults alike. Perfect for parties, celebrations, or a fun family activity, this recipe transforms a typical day into a fun culinary adventure.
This delightful dish resonates not only because of its rainbow hues but also for its versatility. You can customize it by choosing your favorite fruits or by drizzling different types of chocolate or syrups over it, evoking a sense of excitement for everyone involved. Whether enjoyed as a treat after school, a party snack, or a fun weekend project with your children, Fruity Pebbles Sushi unites flavors and memories in a way that’s both comforting and joyful.
Preparation Phase & Tools to Use
To execute this fun recipe with finesse, you’ll need a few essential tools that elevate your sushi-making experience:
- Large Saucepan: This is where the magic begins. Melting butter and marshmallows together requires even heat, and a large saucepan ensures that ingredients blend smoothly.
- Silicone Spatula: A silicone spatula prevents sticking and helps you mix thoroughly without damaging your saucepan.
- Rolling Mat (Optional): While not mandatory, a sushi rolling mat can make the rolling process easier, ensuring that your Fruity Pebbles Sushi is tightly packed and beautifully rolled.
- Sharp Knife: A sharp knife is crucial for slicing the sushi rolls cleanly, allowing you to present those stunning colors and textures beautifully.
When making this dessert, always keep an eye on your melting marshmallows; they can go from perfectly melted to overcooked in moments if you’re not careful. Get everything prepped and laid out before you start, as the mixture firms up quickly once combined.
Ingredients for Fruity Pebbles Sushi
- 1 cup Fruity Pebbles cereal: This colorful cereal provides the signature crunchy texture and fruity flavor.
- 1 cup marshmallows: These add sweetness and create that satisfying gooeyness.
- 2 tablespoons butter: This helps with melting and enhances the flavor of the marshmallows.
- 1/2 cup rice krispies (optional): Adding these provides an extra layer of crunch, though they are not necessary if you prefer a pure Fruity Pebbles taste.
- 1 sheet of nori (seaweed): This savory element contrasts perfectly with the sweet filling.
- 1 banana or fruit of choice: This introduces another flavor layer while adding freshness to each bite.
- 1/4 cup chocolate or flavored syrup for drizzling: This finishing touch adds elegance and enhances the sweetness.
Feel free to seek out different cereals or fruits to personalize your sushi roll. You could easily swap out bananas for strawberries, kiwi, or mango for a tropical twist!
How to Make Fruity Pebbles Sushi
- Melt the Butter: In a large saucepan, melt the butter over low heat. Stir frequently to ensure it doesn’t burn.
- Combine Marshmallows: Once the butter melts, add the marshmallows. Stir until they become entirely melted, forming a smooth, gooey mixture.
- Mix in Cereals: Remove the saucepan from heat. Add the Fruity Pebbles and optional rice krispies. Fold the ingredients together gently but thoroughly until well combined.
- Prepare the Nori: Lay out a sheet of nori on a flat surface, shiny side down.
- Spread the Mixture: Using a spatula, spread the Fruity Pebbles mixture evenly across the nori, leaving about an inch at the top.
- Add the Filling: Place your banana or chosen fruit in a line down the center of the mixture to give each roll a sweet burst.
- Roll It Up: Gently roll the nori from the bottom toward the top, applying light pressure. Seal the end by moistening with a bit of water.
- Slice and Drizzle: Using a sharp knife, slice the roll into bite-sized pieces. Drizzle with chocolate or flavored syrup for that finishing touch before serving.
Let your creativity shine while you roll! Enjoy the process as much as the final result.
Chef’s Notes & Helpful Tips
- Make-Ahead Tips: You can prepare the Fruity Pebbles mixture in advance and store it in the refrigerator for up to 3 days. Just reheat slightly if it hardens before rolling.
- Cooking Alternatives: For a bit of crunch from the oven, consider baking the Fruity Pebbles mixture on a baking sheet for 10-15 minutes at 350°F. This brings a delightful toasted flavor that makes each bite even more satisfying.
- Customization Ideas: Experiment with fillings beyond bananas, such as peanut butter, marshmallow fluff, or even caramel sauce. Don’t hesitate to switch up the drizzles as well, using strawberry or white chocolate sauce for a gourmet touch.
Common Mistakes to Avoid
- Rushing the Melting Process: Crank up the heat and your marshmallows risk burning. Always melt on low heat, stirring continuously.
- Overstuffing the Roll: Less is often more. Overfilling may lead to a messy roll that falls apart. Aim for a balanced ratio of filling and nori.
- Cutting with a Dull Knife: A blunt knife squishes the roll instead of cutting it cleanly. An effective slicing motion avoids squishing that delicious insides out.
What to Serve With Fruity Pebbles Sushi
Enhance your experience with these delicious pairings:
- Fresh Fruit Salad: A refreshing medley of seasonal fruits complements the sweetness of the sushi.
- Ice Cream: A scoop of vanilla or fruit-flavored ice cream offers a creamy contrast that pairs well with the chewy texture.
- Chocolate Dipping Sauce: Serve extra chocolate sauce on the side for those who crave more sweetness.
- Nutella: The rich hazelnut spread provides a contrasting flavor that kids adore.
- Boba Tea: The chewy tapioca pearls and refreshing flavors of boba tea elevate the entire experience.
- Milkshake: A fruity milkshake balances the flavors and provides a refreshing drink to sip alongside every bite.
- Coffee: A subtly bitter cup of coffee juxtaposes the sweetness for an adult-friendly pairing.
Storage & Reheating Instructions
Store any leftover Fruity Pebbles Sushi in an airtight container in the refrigerator for 1-2 days. It’s best consumed fresh, but if you need to save it, keep it covered to prevent the nori from becoming too chewy. While reheating isn’t necessary, if you wish to enjoy it warm, a brief microwave session of about 10-15 seconds can restore some of its original gooeyness.
Estimated Nutrition Information
Approximately per serving (2 pieces):
- Calories: 120
- Total Fat: 5g
- Saturated Fat: 3g
- Carbohydrates: 18g
- Sugars: 9g
- Protein: 1g
Values may vary based on ingredients used and serving size. Always consult a nutritionist for detailed dietary advice.
FAQs
1. Can I use different cereals in this recipe?
Absolutely! While Fruity Pebbles are the star, you can swap in any sweet cereal you prefer. Try Rice Krispies or even Cocoa Puffs for a chocolatey twist.
2. Is there a vegan version of this recipe?
Yes! Substitute marshmallows with vegan alternatives and use plant-based butter.
3. How do I prevent the marshmallows from sticking to the pan?
Using a non-stick saucepan is essential. An additional light coating of butter on the bottom can also help prevent sticking.
4. Can I make these sushi rolls gluten-free?
Certainly! Just ensure your ingredients, particularly cereals and certain syrups, are labeled gluten-free.
5. What fruits can I use besides banana?
Feel free to experiment with strawberries, diced apples, mango, or berries. Any fresh fruit will add delightful flavor and texture.
Conclusion
Fruity Pebbles Sushi invites you back to those carefree childhood days, wrapping them into a light-hearted treat that not only satisfies a sweet tooth but also sparks creativity. So grab your loved ones, roll up your sleeves, and prepare to create something whimsical and delicious. This fun recipe will be a hit, bringing laughter and smiles with each colorful bite. Your kitchen waits for the magic! Indulge, enjoy, and savor every sweet moment.
Print
Fruity Pebbles Sushi
- Prep Time: 15 minutes
- Cook Time: 10 minutes
- Total Time: 25 minutes
- Yield: 4 servings 1x
- Category: Dessert
- Method: No-Cook
- Cuisine: American
- Diet: Vegetarian
Description
A whimsical fusion of childhood cereals and sushi that combines the vibrant crunch of Fruity Pebbles with marshmallows for a colorful treat.
Ingredients
- 1 cup Fruity Pebbles cereal
- 1 cup marshmallows
- 2 tablespoons butter
- 1/2 cup rice krispies (optional)
- 1 sheet of nori (seaweed)
- 1 banana or fruit of choice
- 1/4 cup chocolate or flavored syrup for drizzling
Instructions
- Melt the butter in a large saucepan over low heat, stirring frequently.
- Combine the marshmallows once the butter is melted, stirring until completely melted.
- Mix in the Fruity Pebbles and optional rice krispies, folding gently until combined.
- Prepare a sheet of nori on a flat surface, shiny side down.
- Spread the Fruity Pebbles mixture evenly across the nori, leaving about an inch at the top.
- Add your banana or chosen fruit in a line down the center of the mixture.
- Roll the nori from the bottom toward the top, applying light pressure and sealing the end with water.
- Slice the roll into bite-sized pieces and drizzle with chocolate or flavored syrup before serving.
Notes
Feel free to customize with your favorite fruits or cereals. Store in an airtight container for up to 2 days.
Nutrition
- Serving Size: 2 pieces
- Calories: 120
- Sugar: 9g
- Sodium: 50mg
- Fat: 5g
- Saturated Fat: 3g
- Unsaturated Fat: 2g
- Trans Fat: 0g
- Carbohydrates: 18g
- Fiber: 0g
- Protein: 1g
- Cholesterol: 15mg