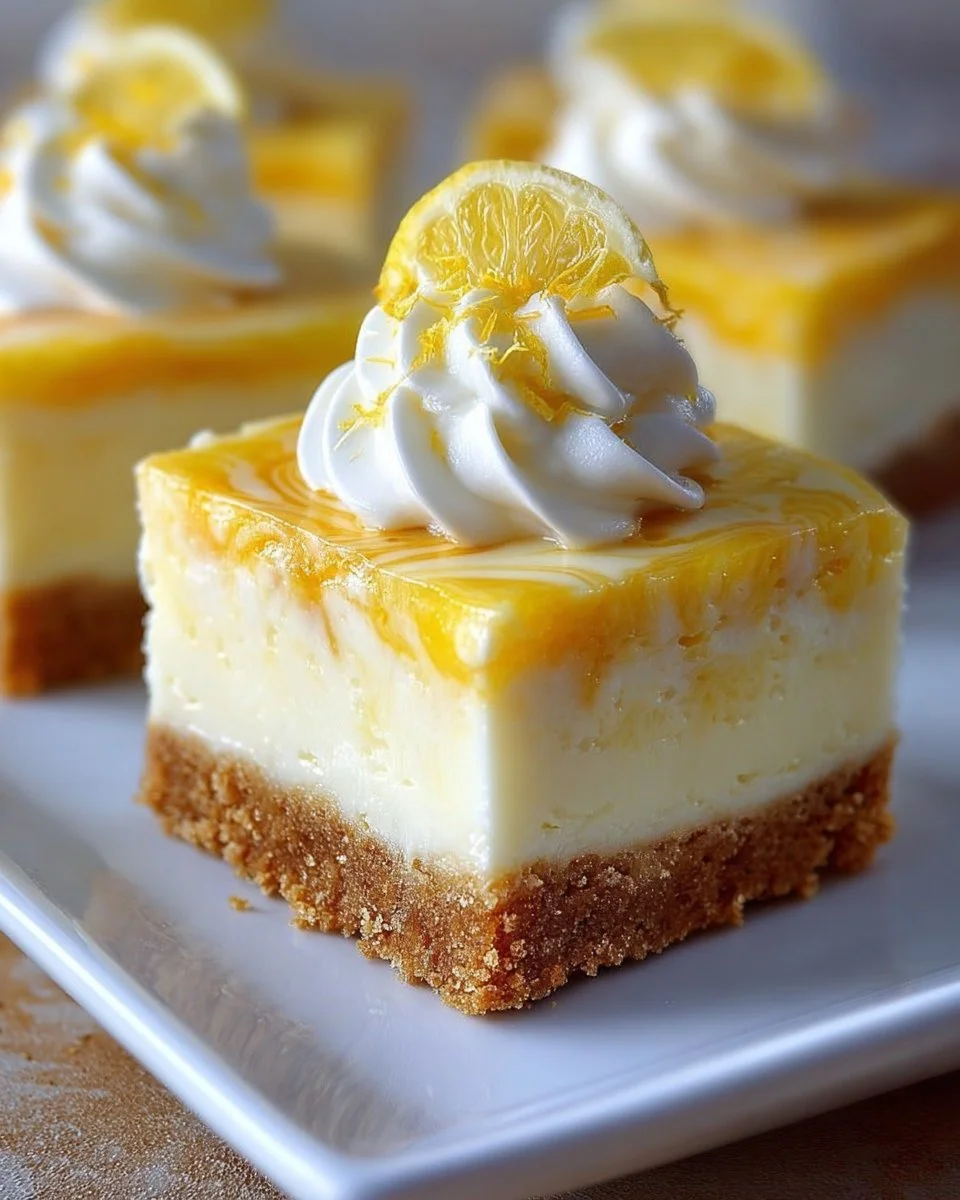
Indulging in the delightful harmony of creamy cheesecake and zesty lemon is a culinary experience that transcends ordinary desserts. Picture this: a silky, smooth cheesecake filling swirled with vibrant yellow ribbons of tart lemon, resting atop a crunchy graham cracker crust. Every bite offers a luscious interplay of flavors and textures that dance on your taste buds, balancing rich creaminess with a refreshing citrus zing. The aroma wafts through your kitchen, beckoning loved ones to gather round as the warm, golden rays of late afternoon sun spill into the room.
Lemon Marbled Cheesecake Bars don’t just tantalize the palate; they create an experience. You serve them chilled, and as the silky bars hit the warm air, the scent envelops everything, invoking memories of summer picnics or special family gatherings. The distinct crunch of the graham cracker crust complements the smooth cream cheese filling perfectly—the crunch of each bite contrasting beautifully with the melt-in-your-mouth creaminess infused with fresh lemon juice that brightens every mouthful.
As you prepare to take your first bite, the silky lemon-laden cheesecake glistens invitingly, adorned with delicate swirls that captivate your eyes, bringing a sense of homemade elegance to your table. These bars hold the potential to transform any occasion into a celebration, whether it’s an intimate family dinner, a warm-hearted holiday gathering, or simply a treat after a long week. You’ll find it hard to resist their charm.
Why You’ll Love This Lemon Marbled Cheesecake Bars
Imagine treating yourself to a dessert that harmoniously combines the rich, creamy sweetness of cheesecake with the bright, refreshing burst of lemon. Each bite of these Lemon Marbled Cheesecake Bars brings a mini-vacation on your palate, whisking you to sun-drenched lemon groves. The unique marbling creates an aesthetic that’s as pleasing as it is appetizing, promising a delightful experience not only for yourself but also for anyone fortunate enough to share them with you.
These bars are versatile too, perfect for any setting. Serve them at birthdays, weddings, or simply as a delightful finish to Sunday dinner. They stand out not just for their stunning presentation but also for the mouth-puckering, summertime essence of lemon that makes them an unforgettable treat. It’s hard not to feel joy with every luscious bite.
Preparation Phase & Tools to Use
Before you embark on this delicious journey, gather your essential tools, each one playing a pivotal role in ensuring your cheesecake bars turn out perfect.
- 9×13 inch Baking Dish: Your main canvas! A sturdy dish that ensures even baking and easy slicing.
- Medium Bowl: A simple medium bowl helps you mix the crust ingredients without any hassle.
- Large Mixing Bowl: This becomes the heart of your preparation, where all the creamy goodness comes together. A sturdy bowl helps you beat the cream cheese into a silky mixture.
- Electric Mixer: A must for achieving that velvety-smooth filling—this tool saves your arm strength and gets the job done efficiently.
- Spatula: Use this handy tool to scrape every last bit of cheesecake filling into your pan.
- Knife: A simple butter knife helps perform the marbling—give it a gentle swirl to create those lovely patterns.
Preparation tip: Keep your cream cheese at room temperature before mixing; this will help achieve that ultra-smooth texture without any lumps.
Ingredients for Lemon Marbled Cheesecake Bars
To truly capture the essence of these delightful bars, you need quality ingredients that come together beautifully. Here’s what you’ll need:
- 2 cups graham cracker crumbs: The base of your cheesecake bars, providing that crumbly sweetness and texture.
- 1/2 cup unsalted butter, melted: This binds the crumbs while adding richness.
- 1/4 cup sugar: A hint of sweetness to balance the tartness of lemon.
- 4 (8 oz) packages cream cheese, softened: The key to that creamy filling; make sure it’s soft for easy blending.
- 1 cup sugar: To sweeten the cheesecake mixture to perfection.
- 4 large eggs: These add structure and help set the cheesecake.
- 1 teaspoon vanilla extract: For a warm, aromatic depth.
- 1/4 cup fresh lemon juice: Brightens and infuses every bite with freshness.
- Zest of 1 lemon: Adds aromatic intensity that elevates the flavors.
If fresh lemons aren’t available, bottled lemon juice works in a pinch; however, zesting fresh lemons takes the flavor to an entirely new level.
How to Make Lemon Marbled Cheesecake Bars
Let’s dive into the process of crafting these delightful bars step by step.
- Preheat your oven to 325°F (163°C) and lightly grease your 9×13 inch baking dish. This ensures easy removal later!
- Combine the crust ingredients: In a medium bowl, mix the graham cracker crumbs, melted butter, and 1/4 cup sugar until it resembles wet sand. Press this buttery mixture firmly into the bottom of the prepared dish to form a solid crust.
- Beat the cream cheese mixture: In a large mixing bowl, combine the softened cream cheese and 1 cup sugar using your electric mixer. Beat until completely smooth and creamy.
- Add eggs one by one: Crack in the eggs, blending them into the creamy mixture individually for a silky texture. Follow with the vanilla extract, fresh lemon juice, and lemon zest, stirring gently until all ingredients blend harmoniously.
- Layer the mixture: Pour half of your cheesecake filling over the prepared crust. Use a spatula to smooth it evenly.
- Create a marbled effect: Drop spoonfuls of the remaining cheesecake mixture over the first layer. With a knife, gently swirl through the mixture to create beautiful marbling. Avoid over-mixing—keep those distinct, enticing swirls!
- Bake to perfection: Place the dish in the preheated oven and bake for 30-35 minutes or until the center looks set with a slight jiggle. A toothpick inserted should come out clean.
- Cool and refrigerate: Allow the bars to cool completely at room temperature before transferring them to the refrigerator. Chill for at least two hours, or overnight if you can wait, before cutting into squares.
Chef’s Notes & Helpful Tips
- Make-Ahead Convenience: These bars can be made a day in advance. They taste even better after chilling overnight, allowing flavors to meld beautifully.
- Cooking Alternatives: For a quicker method, you can use an air fryer if your model accommodates a baking dish. Adjust cooking time as needed, starting with 20-25 minutes, checking for doneness.
- Customization Ideas: Feel free to experiment! Incorporate fresh berries into the swirl or a sprinkle of coconut on top for added texture.
Common Mistakes to Avoid
- Overbaking: Keep a close eye on your cheesecake. The center should remain slightly jiggly for that perfect creamy texture once cooled.
- Ignoring temperature: Ensure your cream cheese is softened to avoid lumps in your mixture, and let the eggs come to room temperature for even blending.
- Skipping the chilling step: Patience is key; cutting them too early can result in a messy presentation. Letting them chill ensures they hold their shape beautifully.
What to Serve With Lemon Marbled Cheesecake Bars
These delightful bars shine on their own, but they pair beautifully with numerous accompaniments to elevate your dessert experience:
- Whipped Cream: A dollop of fresh whipped cream adds a soft, airy finish.
- Fresh Berries: Strawberries, blueberries, or raspberries provide a burst of tartness that harmonizes with the lemon.
- Mint Leaves: A sprinkle of fresh mint elevates the freshness of each bite.
- Coffee or Tea: Brewed chai or an espresso pairs excellently, balancing the sweetness of the bars.
- Chocolate Drizzle: A light drizzle of chocolate ganache provides an enticing contrast against the lemon.
- Caramel Sauce: A warm drizzle brings an unexpected caramel sweetness to each bite.
- Vanilla Ice Cream: A scoop beside the bars gives a delightful contrast in temperatures.
Storage & Reheating Instructions
For optimal freshness, store any leftovers in an airtight container in the fridge. These bars can last for up to five days, though we doubt they’ll stick around that long! If you decide to freeze them, wrap individual bars tightly in plastic wrap before placing them in a sealed freezer bag. They’ll stay fresh for up to three months. When you’re ready to enjoy them, simply transfer to the refrigerator to thaw overnight or leave them at room temperature for a couple of hours.
Estimated Nutrition Information
Each bar offers approximately 250 calories, with 16g of fat, 22g of carbohydrates, and 4g of protein. Please note that this may vary based on specific brands and modifications.
FAQs
Can I make these bars gluten-free?
Absolutely! Substitute graham cracker crumbs with gluten-free options or crushed nuts for a different texture.
Will this work in a smaller baking dish?
For a thicker bar, reduce the baking time slightly and keep an eye on them to avoid over-baking.
Can I use other citrus fruits?
Certainly! Try lime or orange juice and zest for a refreshing twist.
How can I ensure my cheesecake isn’t crack?
Avoid over-mixing and ensure your oven temperature isn’t too high. Additionally, allow it to cool gradually in the oven with the door slightly ajar to adjust to room temperature before refrigerating.
Can I prepare the crust ahead of time?
Yes! Prepare and press the crust into the dish, then cover and refrigerate until you’re ready to add the filling later.
Conclusion
Once you take that first creamy, lemon-infused bite of these marbled cheesecake bars, you’ll understand why they create such joyful experiences. The vibrant colors, the symphony of flavors, and the delicate textures work together to craft a memorable dessert that leaves you aching for more. So gather your tools, indulge your senses, and create a slice of summer bliss with these Lemon Marbled Cheesecake Bars. You won’t just be making dessert; you’ll be creating cherished memories with every slice. Happy baking!
Print
Lemon Marbled Cheesecake Bars
- Prep Time: 15 minutes
- Cook Time: 35 minutes
- Total Time: 50 minutes
- Yield: 12 servings 1x
- Category: Dessert
- Method: Baking
- Cuisine: American
- Diet: Vegetarian
Description
Delightful cheesecake bars featuring a creamy filling marbled with zesty lemon, all resting atop a crunchy graham cracker crust.
Ingredients
- 2 cups graham cracker crumbs
- 1/2 cup unsalted butter, melted
- 1/4 cup sugar
- 4 (8 oz) packages cream cheese, softened
- 1 cup sugar
- 4 large eggs
- 1 teaspoon vanilla extract
- 1/4 cup fresh lemon juice
- Zest of 1 lemon
Instructions
- Preheat your oven to 325°F (163°C) and lightly grease your baking dish.
- Combine the graham cracker crumbs, melted butter, and 1/4 cup sugar in a medium bowl until it resembles wet sand. Press firmly into the bottom of the baking dish.
- Beat the cream cheese and 1 cup sugar in a large mixing bowl until completely smooth and creamy.
- Add the eggs one by one, mixing individually for a silky texture. Then add vanilla, lemon juice, and zest, stirring gently.
- Pour half of the cheesecake filling over the crust and smooth it out.
- Create a marbled effect by dropping spoonfuls of the remaining cheesecake mixture and swirling with a knife.
- Bake for 30-35 minutes until the center looks set with a slight jiggle.
- Cool to room temperature, then refrigerate for at least two hours before cutting into squares.
Notes
For a richer flavor, chill overnight. Use gluten-free graham crackers for a gluten-free option.
Nutrition
- Serving Size: 1 bar
- Calories: 250
- Sugar: 20g
- Sodium: 300mg
- Fat: 16g
- Saturated Fat: 10g
- Unsaturated Fat: 6g
- Trans Fat: 0g
- Carbohydrates: 22g
- Fiber: 1g
- Protein: 4g
- Cholesterol: 70mg